The Saint shirt no longer needs an introduction on this blog. After making it twice, once in white poplin and once in navy micro-checked wool, it was time for a couple of new versions, both very suitable for the upcoming season. A double take, or two for one!

The oversized shirt is having a moment again, and I love it. It feels wonderful to wear, and the boxy fit reminds me of the 90’s fashion. This particular pattern is from the book SY by the Swedish designer Ann Ringstrand which was an instant success. The proportions are so clever, and everything about the design feels considered and well thought out. The slightly oversized collar and cuffs, the pocket placement – it’s all good.

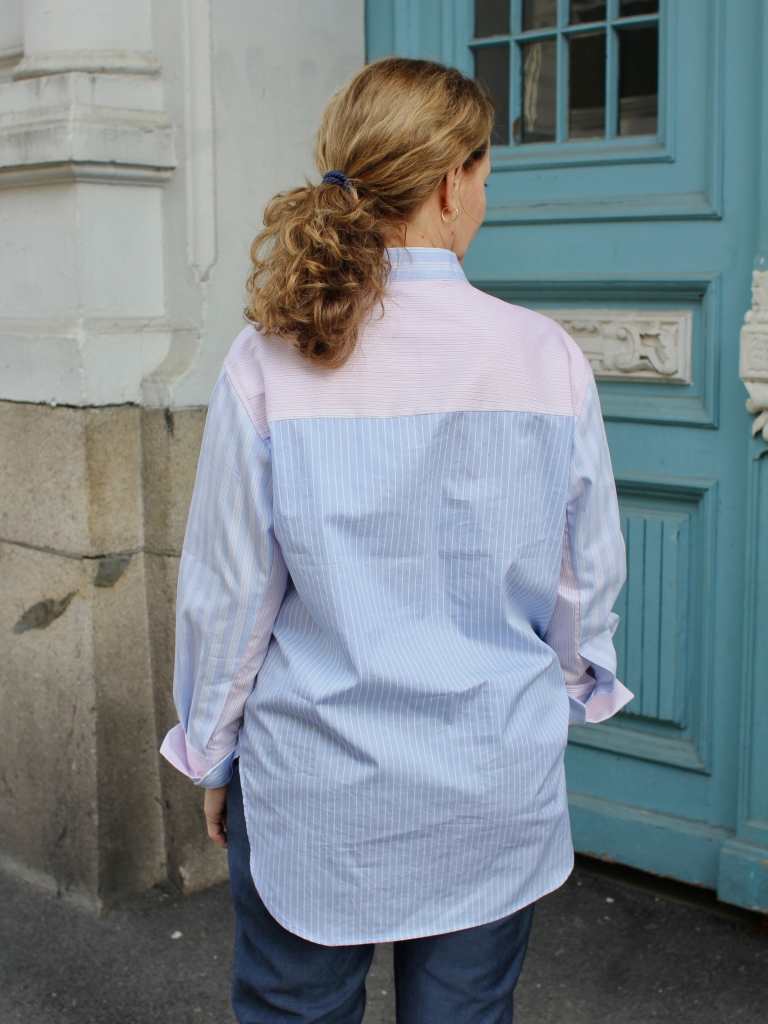
This time I made a small hack, I omitted the collar and used the collar stand only. The decision was partly made because of my first fabric choice, a very crisp light blue cotton with pinstripes. This fabric screams “business as usual” and I didn’t want a classic work appropriate shirt, I wanted something softer and more casual. Besides, I’ve always liked the look of collar bands as an alternative to a full collar.
The light blue shirt is the serious sister, ready for work and some play, too. I placed the stripes horizontally on the yoke, pocket and cuffs, but played down the contrasts and even used light blue buttons. The final result is very much as I envisioned it. This shirt will be on heavy rotation in my wardrobe as long as it stands up to wash and wear.


The idea of making shirt “twins” came about while I was cutting out the first one. I had a quite large piece left with enough fabric for a back and one front plus some, but it was clearly not enough for a complete shirt. Inspired by an idea in Ann’s book, I collected a few other second hand shirts in the same fabric weight (while the shops were still open), cut them apart and made up the rest of the shirt parts from a pink striped shirt, a light blue striped pajama top and finally a monochrome hot pink shirt. I wasn’t interested in too much contrast, so I saved the hot pink for the inside of the collar stand and the yoke, and I used pink for the button holes to tie everything together.
For a pattern mixing project to look intentional, it has to have some design elements that ties the parts together: Pattern and color must be related in some way, either by contrast or harmony. In this case, the colors are soft and low contrast, while the patterns are very similar. The hot pink adds a little interest without drawing much attention.

Normally, I’m not a “pink” person at all. I didn’t use to be a light blue person either, but a few years ago I noticed the color was more prevalent in my wardrobe. Now I think a blue shirt is at least as versatile as the white ones, and I always have at least one light blue shirt in rotation. I have a couple of soft pink shirts and tops, too, but I’m still weary of the color. So, wearing a shirt in pink AND light blue is a huge leap for me.
The pink/blue shirt is the fun sister, the funny and humorous one. She’s looking for adventure but can be very serious if she needs to. It all depends on the context and what she’s combined with.

The light blue pinstriped fabric was purchased last spring from Metermeter. It is deadstock fabric and the most gorgeous cotton shirting I’ve seen in a while. It is as light as a cloud, both soft and crisp with a little shine to it. I was very pleased to find ready-to-wear shirts in the second hand shop with the same good quality cotton.


Both shirts were sewn batch style: All the button bands, both yokes, all four sleeves and so on. This is very efficient if you are able to use the same thread throughout the process. This time I used a pale blue thread in the sewing machine and white in the overlocker almost all the time. I only changed for pink when I reached the last step, the button holes and buttons on the fabric mixed shirt.
I haven’t much to add about the pattern or sewing process that I haven’t said already in my other posts. I shortened the sleeves and body with 3-4 centimeters this time, too. The sleeve split still puzzles me, though. My solution is to sew in the following steps:
- Fold and iron the facing of the under split and sew
- Sew the two pieces together, stop at the corner
- Overlock the edge all the way and press towards the front
- Fold and iron the facing on the over split
- Stitch down through all layers from the corner, continue along the edge of the upper split facing (avoid the under split)
The result looks good, and I love the two-piece sleeve which gives more opportunities for pattern mixing.


Here they are, my twin Saints together. I was instantly pleased with the first one, but the second one is definitely growing on me, too. Which one is your favorite?
I guess I now have enough Saint shirts for the time being. The book suggests making a short sleeve version which could be interesting to add to the collection. Another suggestion (with the accompanying pattern pieces) is to make it as a shirt dress, which definitely is a tempting option. I’m thinking dark blue linen or maybe needlecord in warm sand.

If you are interested in reading about the other two Saint shirts I’ve made or any of my other projects from my book, you can find it here: SyAnnRingstrand – so far I’ve made four shirts, two blazers, two pairs of trousers and a sleeve scarf. There are many great versions of the shirt and many other projects on Instagram if you peruse the #annringstrand tag.
Pattern: Saint shirt from Sy – 10 nya modeplagg av designer Ann Ringstrand (Swedish only)
Size: Small (down one size)
Fabric: 2 meter dead stock cotton shirting from Metermeter, (Denmark), unfortunately sold out and pieces and buttons harvested from three second hand shirts
Time: One-two days

Both shirts are beautiful. I really like the pink and blue and think you really succeeded in mixing the fabrics. I’m a big fan of sewing with quality shirting. And I use second hand men’s shirts all the time. My favorite way to use them is to take two or three and make one dress. The off cuts get used for facings and pocket linings.
LikeLike
Thank you Mary! I need at least two old shirts to make a new one, too. Do you use the fabric only, or do you keep anything as it is?
LikeLike
I love this shirt and particularly your blue woollen version. Thanks so much for posting the steps you took on the sleeve placket – it has been driving me crazy – with the added mystery of google translate results thrown in. Your post is so helpful!
LikeLiked by 1 person
Thank you, Justine! I could wear one every day, and I actually do wear mine very often. I’m happy to hear that my explanation is helpful. Many people have complained about the instructions. Even though I can read Swedish, I find them confusing or insufficient, so I needed to improve them a little. Have you made anything from the book yet?
LikeLike
I just came across your blog post. I was searching online for more information about sewing the sleeve plackets on the Saint Shirt. (After translating the Swedish to English using Google translation, I still couldn’t understand how to deal with the sleeves.) Thank you! Your list regarding the order of operations explained it all!
LikeLike