This version of the Skill blazer from the book SY is the result of combining four different remnants from my stash. I challenged myself to create something from a somewhat random selection of fabrics, and also to sew it up without looking at any instructions. This included making a pattern for the lining because the original version is partially lined only.

I’ve seen several interesting garments made from remnants on Instagram lately. Some of them are beautifully pieced together from scraps. As long as the colors and patterns are coherent in some way or another, it works really well. One of my favorite makers is Lauren of Elbe Textiles. She is a talented pattern designer, and she makes beautiful garments from scraps.
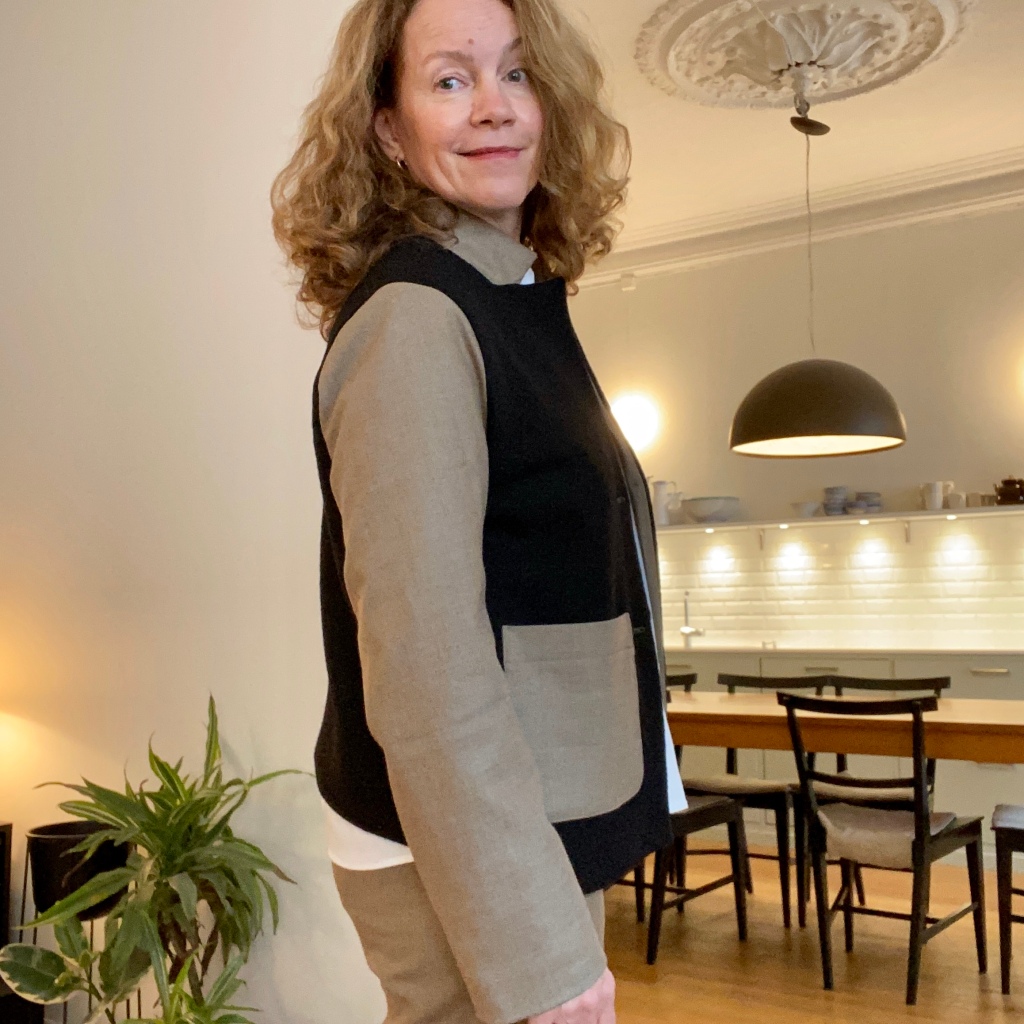
Personally, I usually don’t enjoy wearing clothes with a lot of pattern or colors, but I still wanted to see if I could find a way to use some of the unloved old remnants in my stash. So, no patchwork, but still pattern and texture mixing with some color blocking. The result is very far from the original inspiration, but it feels like me, and that’s what matters.

Pink lining from another jacket,
ochre viscose from a blouse
Camel suiting from a pair of trousers,
black boiled wool from a cardigan
I had a small piece of black boiled wool and a similar sized piece of camel colored wool suiting. The suiting is significantly lighter than the boiled wool, so I figured the black wool had to be used for the front and back while the suiting would be best for sleeves, pockets, collar and facings. When I cut it out I literally only had threads left, not even enough for the third chest pocket. For the lining, I found a small remnant of an Atelier Brunette viscose in ochre. I really love the colors and picked out the final remnant, a soft pink lining for the sleeves based on the pink in the pattern on the viscose. None of the remnants were bigger than about 70-80 centimeters, and not really big enough to become something on their own.

My pattern of choice was the Skill blazer from Ann Ringstrand’s book SY which I’ve made once before. It is a brilliant, modern take on the blazer with more than a nod to workwear. The slim collar can be left standing up or be folded down, and it has two-piece sleeves and patch pockets. The line drawings show a suggestion for how to piece together the front and the sleeve from different fabrics. It is an interesting and balanced design. You can, of course, skip this and make the entire jacket in the same fabric. I decided to do something in between the two and make a symmetrical jacket in the two fabrics.

Ochre viscose 
Pink sleeve lining
First of all, I needed to draw a pattern for the lining. This is quite easy to do. You need transparent tissue paper you can layer over the original pattern pieces. Start with the pattern for the back (remember to layer the bottom facing on top of it), add the issue paper and draw a facing at the neck (it should be around 5 cm deep), then add seam allowance. Trace the rest of the back minus facings plus SA. The main back lining pattern needs an extra 2 cm ease against the centre back fold for movement. Mark the pleats at the top and bottom with notches. For the front you need to layer the facings (front and bottom) over the outer pattern piece, trace the lines and add seam allowance. The sleeves are simple, just use the sleeve pattern pieces minus the hem. I lined the pockets, too, using the pattern pieces without the hem there as well. I apologize if this makes no sense. Don’t hesitate to ask if you have any questions.

I have made a few jackets lately, but I still have a lot to learn. Constructing a jacket without instructions felt like a fun challenge, and to my surprise it went reasonably well. I made my fair share of mistakes, but none were irreversible. The worst that happened is that the first sleeve went in pointing backwards hahah. My main take away is that when sewing a notched collar it is very important to be accurate, and to make a snip into the corner to release the seam allowance and make everything nice and flat. Remember to interface the collar pieces, facings, sleeve hems and the top of the pockets. The lining were bagged out through a small hole in one of the sleeve seams. Pure magic every time. Everything was sewn on my beloved Pfaff, no hand stitching.
I love everything about this blazer pattern. It feels very current, relaxed and is simple to wear. The most interesting elements of the design are the standing collar and the curved hem which slants gently towards the front. The sleeves are so well drafted and have a perfect fit, slightly wider at the hem. I have shortened everything quite a bit, both the sleeves and the body by 4 cm, and it is still plenty long enough (I’m not tall, only 1.63 cm). I also sized down one size because it has a lot of ease built in. The fit I achieved is just how I like it, not oversized, but relaxed and easy to wear.

Cool with the collar up 
Not cool with the collar down
I definitely prefer the collar standing up on this version. If made up in the same fabric or color all over, I think this style of blazer looks good with the classic folded down collar, too, but then I would want the stance to be considerably lower. My version looks like a kind of vintage sports jacket with the collar folded down, am I right? When it’s folded up, however, it reminds me of the varsity jackets that were all the rage when I was young, just in a more refined edition. That’s a look I can do, although that’s retro now, too!
I am surprisingly pleased with this jacket. Not only did I manage to make a dent into my growing pile of remnants, but I made something I’m actually going to wear. Sewing without instructions was challenging in a good way and built some confidence to try more complicated constructions later. I’m definitely not finished with the patterns in this book yet, more is to come.
Pattern: Skill blazer from the book SY – 10 nya modeplagg av designer Ann Ringstrand (Swedish only)
Size: S (sizing down from M)
Fabrics: Remnants from my stash plus interfacing for the collar, facings, sleeve hems and pocket tops.
Time: A couple of days
More about my projects from the book SY

Really nice jacket Ingunn
LikeLiked by 1 person
Thank you, Andrea! It was fun to sew.
LikeLike